Applying Increases to Existing My Site Storage Quotas
October 26th, 2012, by Ben Hungerford
Out of the box a My Site is limited to a maximum of 100 MBs, and generates a size warning at 80 MBs. Those last 20 MBs can .go quickly, and SharePoint will not allow users to create or upload new documents once they’ve hit that limit… Worse yet, that limit may present as other types of errors, making it difficult to pinpoint – for example, auto-syncing OneNote 2010 Notebooks will simply generate errors during sync, and the errors you get are not clear and obvious. (This, in fact, is the use case that inspired this post).
To understand how we approach increasing existing My Site storage quotas, it’s critical to understand the following:
- Each My Site is a Site Collection – when a user visits the My Sites web app for the first time a new site collection named after the user account is generated under the managed path “personal”, it assigns the user as the site collection administrator of the new site collection
- Each My Site Site Collection has the “Personal Site” quota template applied to it at creation – even if you selected “No Quota” as the default quota template for your My Sites web application, the “Personal Site” quota template is always applied when each My Site site collection is created
- A Quota template is a template – at the time that a site collection is created the settings for the specified Quota Template are applied, thereafter changing the Quota Template does not affect any site collections which were previously created using that template. In other words…
- Changes to pre-existing My Sites should be effected by manually applying a Quota Template to that pre-existing My Site – if you wish to change the quotas for a given My Site you do so by applying a quota template to the My Site. If you wish to make changes to an existing quota template and have those changes reflected in existing My Sites you must re-apply that quota template to all My Sites which were created with it
-
It’s also possible to create and apply an “Individual Quota” for just one My Site – I’ll discuss the approach for this at the end of the article
So in a nutshell our approach to updating My Site storage quotas will be:
- Assess the environment and determine what My Sites need to be updated
- Create new quota templates or apply changes to existing quota templates
- Apply our quota templates to existing My Sites
- Confirm that the changes have been applied
Assess the environment and determine what My Sites need to be updated
Central Admin – the Central Admin GUI is a valid approach if you only need to update one or two My Site quotas and you’re already aware of which My Sites need to be updated. However, there are some real disadvantages to doing this through Central Admin, and at least one significant gotcha. If you have one user on the phone with you right now and need to affect an immediate change to his or her My Site then Central Admin is the quickest option, but it’s not an effective method for administering the quotas of all of the My Sites in your farm. The screen for managing the quota of a single My Site can be found in Central Admin under Application Management -> Configure quotas and locks.
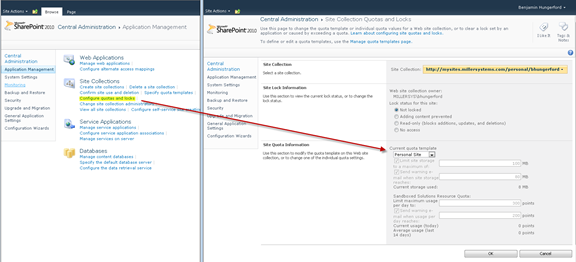
The disadvantages: we can only review one My Site at a time through Central Admin. Further, the Configure Quotas and Locks screen doesn’t tell you the current utilization of the My Site, only the quotas and the template which those quotas were based on. If you’re trying to perform any kind of proactive administration of the My Site quotas then Central Admin does not have sufficient data for you to do that. Most importantly however, be aware that this screen is going to lie to you. The values displayed under Site Quota Information above represent the quota which will be applied to this My Site if we click ok, NOT the current quota which the My Site is actively running under. Remember, changes to a quota template are not retroactively applied, but this screen will handily make you think they have been. For example, if we were to edit the Personal Site quota template to limit site storage to a maximum of 200 MB rather than the 100 MB default we might then open this page, glance at the “Limit site storage to a maximum of” line, see 200 MB, and pat ourselves on the back. Wrong! This My Site will continue to use the old 100 MB limit under the updated Personal Site quota template is reapplied by opening this screen and clicking Ok.
STSADM – the command line is my preferred approach to audit quotas and utilization for all My Sites, it gives us all the data quickly and unlike Central Admin is never ambiguous. As with many scripting problems in SP2010 there’s both a stsadm solution and a PowerShell approach available for reviewing the current quota assignments and utilization of the My Sites. I generally hesitate to recommend stsadm, but this is, unfortunately, one of those rare cases where the stsadm output is significantly more consumable than the PowerShell output (without a lot of scripting.) The command below outputs an XML formatted list of all site collections within the specified web application, including the currently configured storage warning, storage maximum, and storage used in megabytes.
From the command line or in the SP2010 Management Shell execute the following…
Command Syntax: STSADM -o enumsites -url <MySites Web Application URL>
For example, STSADM -o enumsites -url http://mysites.contoso.com produces the following output in my development environment:
<Sites Count=”6″>
<Site Url=”http://mysites.contoso.com” Id=”6ed4dda1-d139-443f-878c-1aeba389173f” Owner=”CONTOSO\bhungerford” ContentDatabase=”WSS_Content_MySites” StorageUsedMB=”5.9″ StorageWarningMB=”0″ StorageMaxMB=”0″ />
<Site Url=”http://mysites.contoso.com/personal/jfett” Id=”ce21799c-7657-41d4-8715-15a36aa8c59e” Owner=”CONTOSO\jfett” ContentDatabase=”WSS_Content_MySites” StorageUsedMB=”100″ StorageWarningMB=”80″ StorageMaxMB=”100″ />
<Site Url=”http://mysites.contoso.com/personal/hsolo” Id=”69daaae4-a24c-406d-adea-43a305791e53” Owner=”CONTOSO\hsolo” ContentDatabase=”WSS_Content_MySites” StorageUsedMB=”55″ StorageWarningMB=”80″ StorageMaxMB=”100″ />
…
</Sites>
We quickly see in the XML output that the JFETT user is in some trouble. He has 100 MBs used out of his 100 MB storage maximum, and is going to be unable to add or change anything on his My Site. As you might suspect, the XML output from the stsadm command is going to get large if you’re troubleshooting a My Site implementation with thousands of users. Fortunately, you can always redirect standard output to a file for review, or fall back on PowerShell for a targeted approach (take a look at Quota and Usage on the SPSite object).
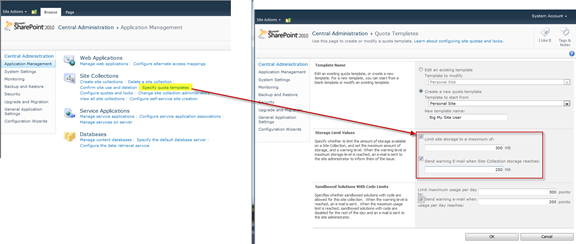
Create new quota templates or apply changes to existing quota templates
Central Admin – use Central Admin to create or edit one of the Quota templates to enforce the policy. Remember your approach here could be to increase the size of the default and then re-apply that quota template to existing My Site site collections. However, in the example below, we’re creating a new policy based on an existing one, since we don’t want to over-allocate the storage space for any new My Sites. We’re effectively creating a separate quota template for governance of My Site “power users”.
Apply our quota templates to existing My Sites
Central Admin – As mentioned above we can apply an updated quota template to an existing My Site through the “Configure quotas and locks” page in Central Admin. Select the My Site site collection to be updated, choose the desired quota template, and click Ok to update. The selected quota template is applied to the selected My Site site collection. Remember that if you’ve made changes to the current quota template you still need to perform this operation for each My Site in order for that change to take effect.

PowerShell – We can also quickly apply a quota template through PowerShell. This provides a much easier path for bulk updates of My Sites.
Command Syntax: Set-SPSite -Identity “<My Site URL>” -QuotaTemplate “<Template Name>”
Example Command
Command Syntax: Set-SPSite -Identity “http://mysites.contoso.com/personal/jfett/” -QuotaTemplate “Big My Site User”
Confirm that the changes have been applied
STSADM – A second call to stsadm allows us to confirm that the changes have been successful:
STSADM -o enumsites -url http://mysites.contoso.com
<Sites Count=”6″>
<Site Url=”http://mysites.contoso.com” Id=”6ed4dda1-d139-443f-878c-1aeba389173f” Owner=”MILLERSYS\bhungerford” ContentDatabase=”WSS_Content_MySites” StorageUsedMB=”5.9″ StorageWarningMB=”0″ StorageMaxMB=”0″ />
<Site Url=”http://mysites.contoso.com/personal/jfett” Id=”ce21799c-7657-41d4-8715-15a36aa8c59e” Owner=”CONTOSO\jfett” ContentDatabase=”WSS_Content_MySites” StorageUsedMB=”100″ StorageWarningMB=”250″
StorageMaxMB=”300″ />
<Site Url=”http://mysites.contoso.com/personal/hsolo” Id=”69daaae4-a24c-406d-adea-43a305791e53” Owner=”CONTOSO\hsolo” ContentDatabase=”WSS_Content_MySites” StorageUsedMB=”55″ StorageWarningMB=”80″ StorageMaxMB=”100″ />
…
</Sites>
Success! Our “Big My Site User” template has been applied to the JFETT My Site and the storage maximum has been increased to 300 MBs.
A Word on Individual Quotas
Through the Central Admin “Configure Quotas and Locks” page it’s also possible to select “Individual Quota” from the quota template drop down and either specify a one-off site storage maximum and warning threshold for a My Site or remove the quota requirements altogether. This can provide a quick fix if you have one user with a significantly different My Site size requirement, however it also definitely introduces complexities in governance. I recommend creating and applying quota templates whenever possible, to keep your My Sites as consistent as possible.
Can we not run this command to set the quote on all the personal sites together, it will be a challange to set it for each user?